
-
Downloadable Online Registration User Guide
Contents
Selecting a Registration Packet
Adding Additional Parents and Guardians
Additional Student Information
Emergency Contact Relationships
Registering a Student with
Online RegistrationIf you are a new Parent/Guardian to the area, welcome! This guide will walk you through the Online Registration process.
Currently, Online Registration is set up to allow you to register your student for their home school or for Virtual Scholars Academy. If you would like to register for another school, contact the office of that school for assistance.
Create an Account
If you are a new parent to the area, you can create an account and begin using our system.
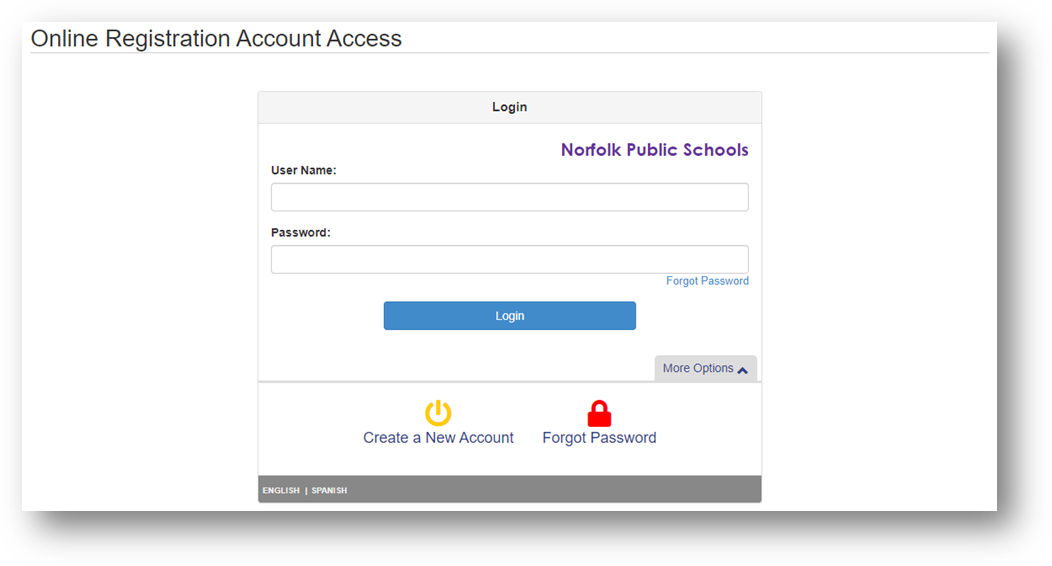
To begin, go to https://va-nps.edupoint.com/PXP2_OEN_Login.aspx
Left-click “Create a New Account” at the bottom of the screen.
Questionnaire
Answer the Questionnaire correctly to the best of your ability. This helps us make sure that the records are accurate and that you will have correct access to your student’s records.
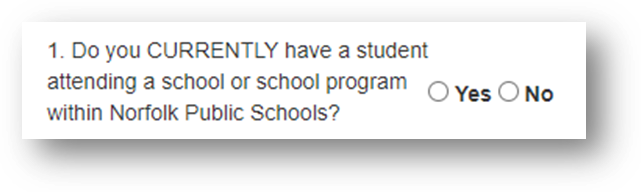
If you currently have a student attending a school or program within Norfolk Public Schools, you already have an account! Contact the office of the school you are trying to register your student for and they can provide you with correct access. If you currently have a student attending a school or program within Norfolk Public Schools, left-click “Yes” and if not, left-click “No”
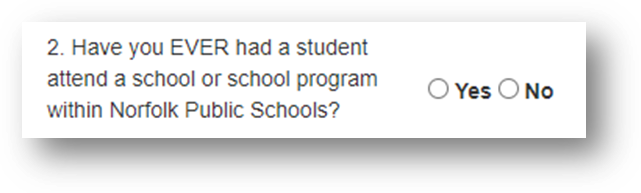
- If you have ever had a student attend a school or program within Norfolk Public Schools, you may have an account already. Contact the office of the school you are trying to register your student for and they can provide you with correct access. If you have never had a student attend a school or program within Norfolk Public Schools, left-click “No”
- If you have ever requested or had access to any of the online parent accounts in Norfolk Public Schools, you may have an account already as well! Contact the office of the school you are trying to register your student for and they can provide you with correct access. If this is the first time you have ever tried to get access to an online parent account system, left-click “Yes.”
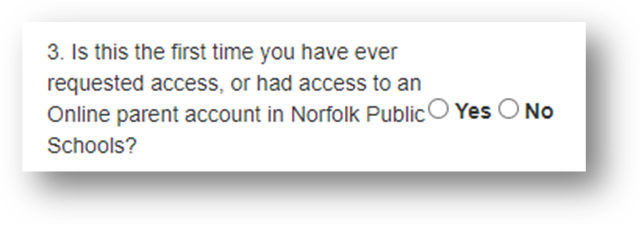
Once you have answered all three questions, left-click “Continue”
Privacy Statement
Read through the Privacy Statement. If you agree to the terms, left-click “I Accept.” You must agree to the privacy statement to use Online Registration.
If you do not agree to the Privacy Statement, left-click “Return to login”
Create Your Account
Left-click on each of the text boxes and enter the corresponding information.
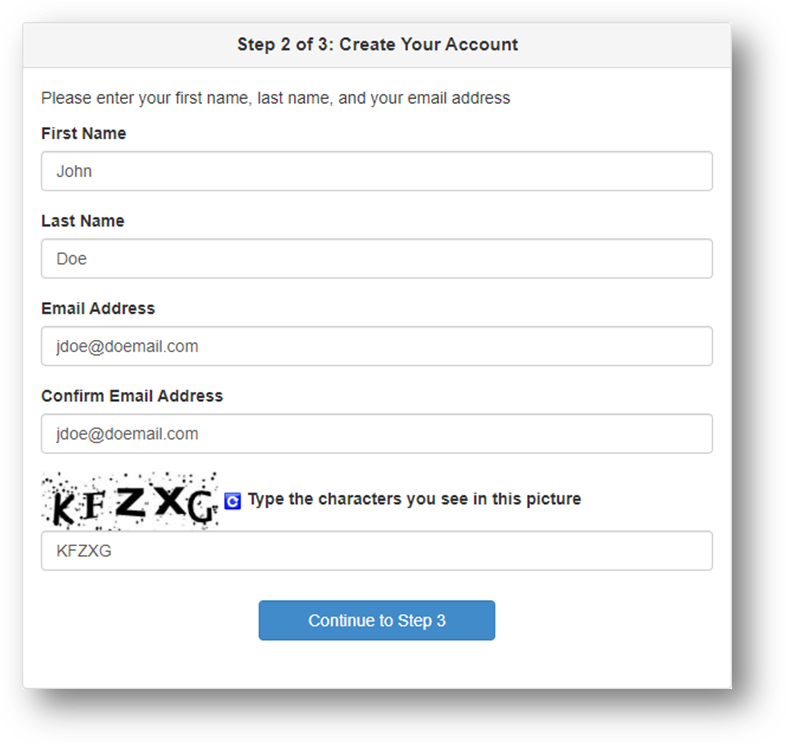
For First Name, left-click on the text box and type your legal first name.
For Last Name, left-click on the text box and type your legal last name.
For Email Address, left-click on the text box and type the email address you would like associated with your account.
For Confirm Email Address, left-click on the text box and type the email address you would like associated with your account again. This is to make sure it is entered correctly.
For the last text box, you will need to enter the letters or numbers that you see in the image into that text box. This is a step used to protect against spam. In the above image, the characters are “KFZXG” but in your image it may be different – enter the characters associated with your image.
Once you have entered all of the information specified, click “Continue to Step 3”
Account Confirmation
An email has been sent to the address specified in Account Creation. Open that email and left-click the blue, underlined “here” to complete the account creation process.

Create Password
Now that your email has been verified, you can enter a password.
Left click the “Password” text box and enter a password for your account. To be sure it was entered correctly, enter the same password into the “Confirm Password” text box.
Once you have chosen a password, left-click “Save and Continue”
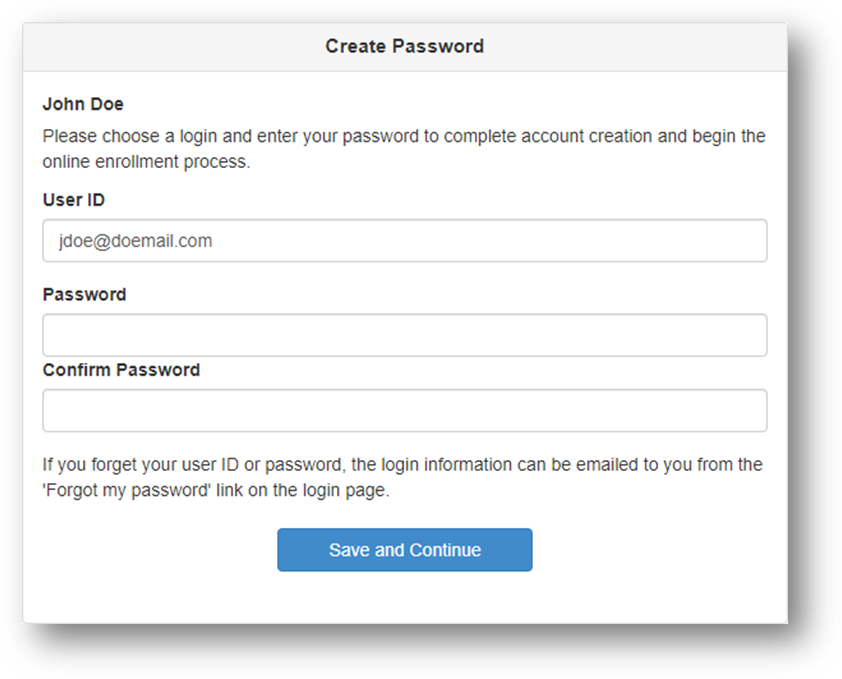
Once you have entered a password, you will be signed in and taken to Online Registration.
Online Registration
Selecting a Registration Packet
More often than not there will be more than one registration packet to choose from for online registration. This may be for different programs, or for different school years.
Left-click on the dropdown menu to select the Online Registration for the correct year.
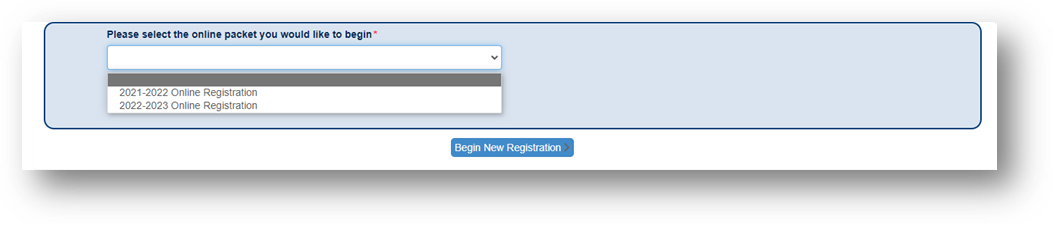
The list above shows two available registration packets. The first is for the 2021-2022 school year, which begins in September 2021 and ends in June of 2022, and the second is for the 2022-2023 school year, which begins in September 2022 and ends in June of 2023. Your options may be different depending on what school years are available at a given time.
Select the registration you would like to complete and left click “Begin New Registration.” If only one registration packet is available, you will be automatically directed to that packet.
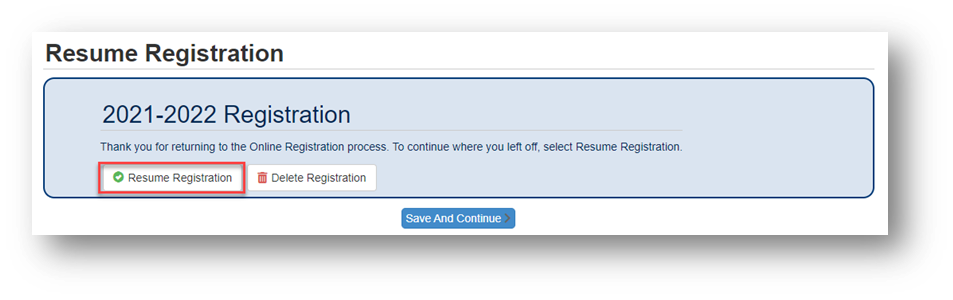
What if I cannot complete the registration packet in one sitting?
If you are interrupted, need to take a break, or for some other reason are not able to complete the registration packet in one sitting, you can click the “Log Out” button at the upper-right hand corner of the screen at any time.
When you log back in, you will be prompted with a screen to resume the Online Registration Packet you had already begun. Simply left-click “Resume Registration” to resume filling in that packet.
Introduction
The Welcome Page will give you an overview of some of the required documentation that you will need later on in the registration process. These documents can either be uploaded during the registration process or hand-delivered to the school office.
Once you have completed the Online Registration process, please contact the school to schedule your in-person registration appointment. Your student is not enrolled until this appointment is completed.
Proof of Residency
In order to register a student in Norfolk Public Schools, you must provide us with at least one piece of documentation indicating your place of residency. You can upload this during registration or deliver it to the school office.
Immunization Records
Virginia State Law requires that all students entering Virginia Public Schools to be immunized before the start of classes. Proof of these immunizations or a signed waiver is required at the time of enrollment.
For more information, contact the Norfolk Department of Health at (757) 683 – 2800.
Birth Certificate
The Birth Certificate is used to verify the student’s correct name and date of birth. Federal, State, and District guidelines require student’s names to be entered using the legal name on the student’s birth certificate unless there is a court-ordered name change. Documentation of this name change must be provided at enrollment.
Legal Guardianship or Custody Papers
We must have a photocopy of the court papers granting guardianship under the following scenarios:
- If an adoption has taken place, it is reflected with an amended birth certificate, and student lives with adoptive parents as listed on the amended birth certificate.
- If student lives with one custodial parent as the result of a divorce.
- If the student lives with anyone else, i.e. grandparents, aunt, uncle, sibling, friends, or other relatives
These documents may be uploaded at the time of registration or they may be hand delivered to the school office.
When you are ready to begin with registration, click “Continue.”
Student Summary
If you are registering a student for the first time, there will be no students on file for you. If you are expecting to have a student in the system already, contact your student’s school for assistance.
If you are enrolling a student for the first time, left-click “Save and Continue” to begin.
Signature
This screen is going to ask for an electronic signature that you attest that you are the person associated with the account, you are authorized to provide the information you are providing, and that it is accurate to the best of your knowledge.
Left-click the text box and enter your legal first name and legal last name that you provided during account creation. They are displayed at the upper-right corner of the screen.
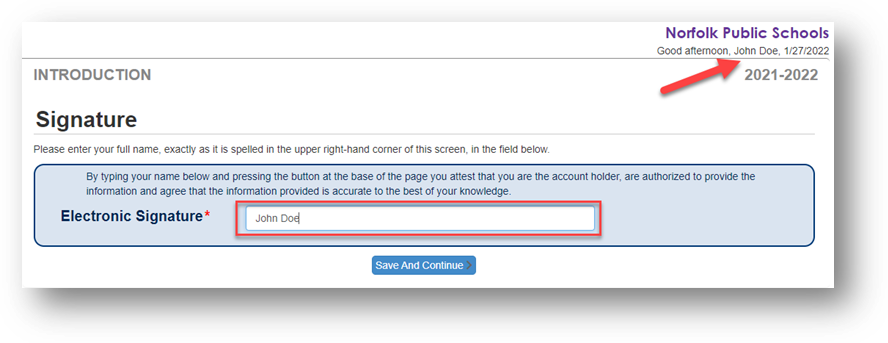
Once you have electronically signed, click “Save And Continue”
Family Information
This section will consist of information relating to the family unit as a whole, not necessarily to a specific student.
Home Address
Enter the home address you are enrolling a student from. Addresses must be valid addresses in of the City of Norfolk.
You can search for your address using the search bar by left-clicking on the search box, typing your address, and then selecting the address from the list.
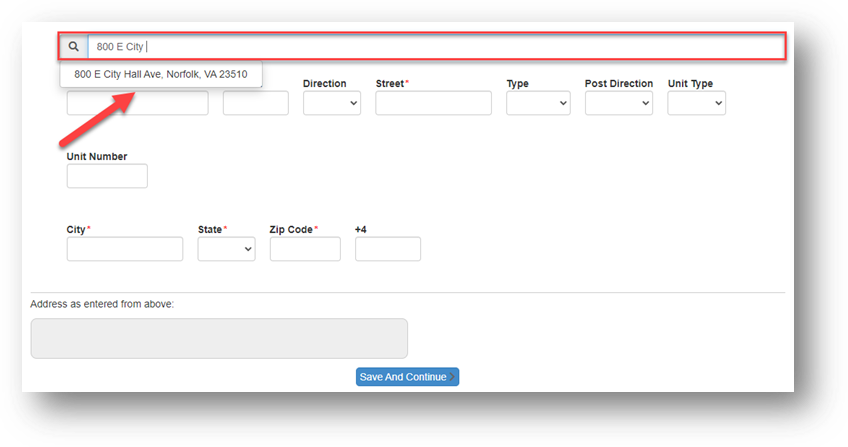
You can also manually enter your address using the form.
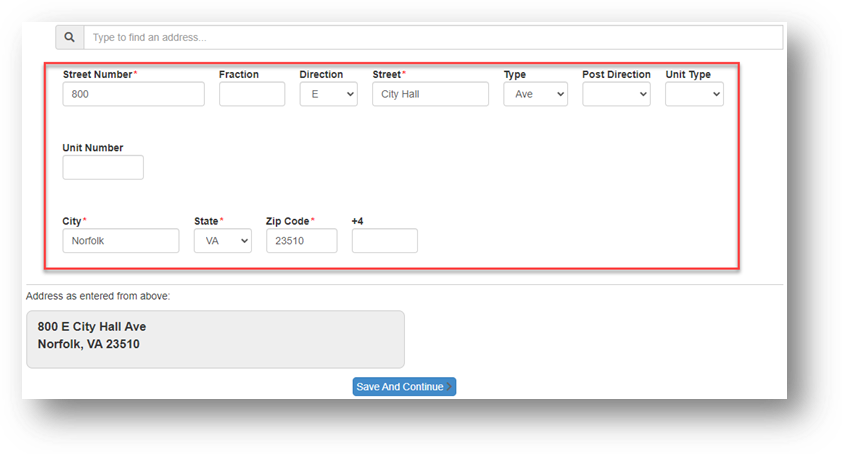
Once your address appears correctly in the gray box, left-click “Save and Continue” to continue.
Mail Address
Enter your mailing address. If you mailing address is the same as your home address, you can left-click the checkbox labeled as such and skip this section.
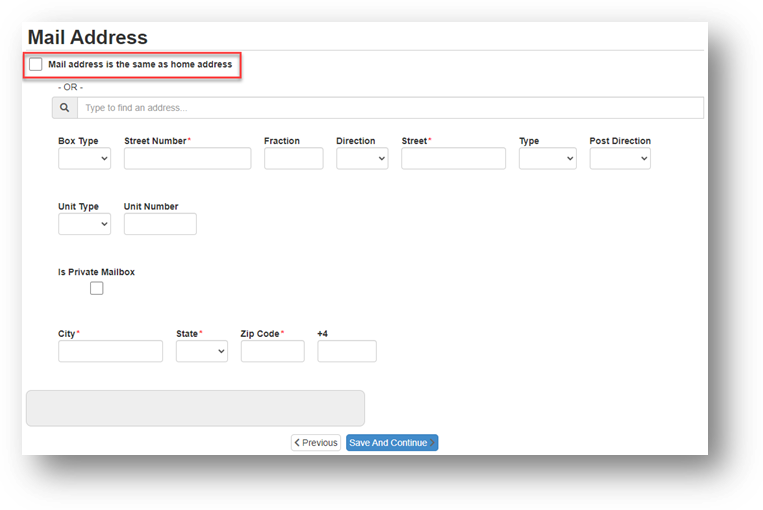
If your mailing address is different than your home address, you can enter your Mailing Address using the same controls as you did for your Home Address
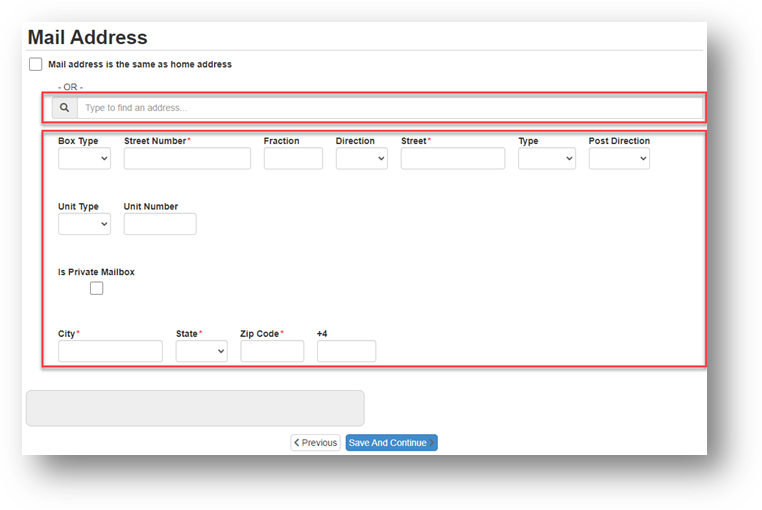
Once your mailing address appears correctly in the gray box, select “Save And Continue”
Parent/Guardian
We will now ask for information about Parents and Guardians.
Demographics
For the first screen, update the information for the Parent or Guardian listed. The first time you do this, it should be your own name.
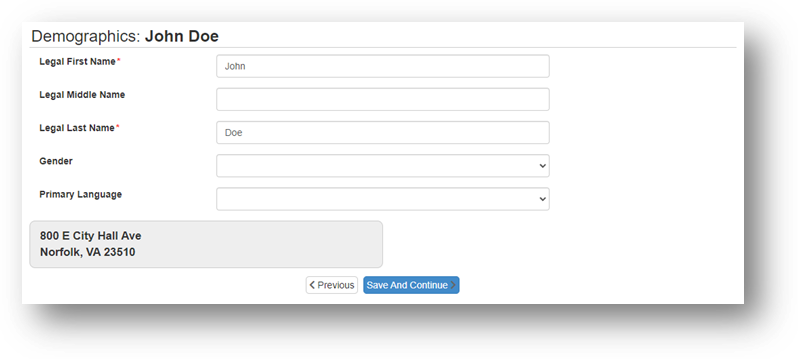
Make sure your Legal name is correct, and make a selection for your gender and primary language by left-clicking on the dropdown menu and left-clicking on the appropriate response.
When you have finished making your selections, left click “Save And Continue”
Contact Information
Enter a contact number for the specified Parent or Guardian.

X
Left-click this checkbox if you would like to remove this number as a contact number.Line
The line number for the table. You do not need to do anything with this number.Primary
Left-click this checkbox if you would like this to be the primary number we contact you at. You should select at least one phone number as primary.Type
Left-click the dropdown menu and select what type of phone this number is associated to.Phone
Enter the area code, exchange code, and subscriber number, into the respective parts of the 10-digit-phone number.Extension
Enter an extension, if applicable.Contact
Left-click this checkbox if you would like us to contact this number with our automated messaging service. This service is used to provide students, parents, and guardians with information regarding (among other things) school and program closures and delays (usually as a result of weather).Not Listed
Left-click this checkbox if this number is not listed.If you would like to provide us with additional contact numbers to reach this parent or guardian, you can click the “Add New” button
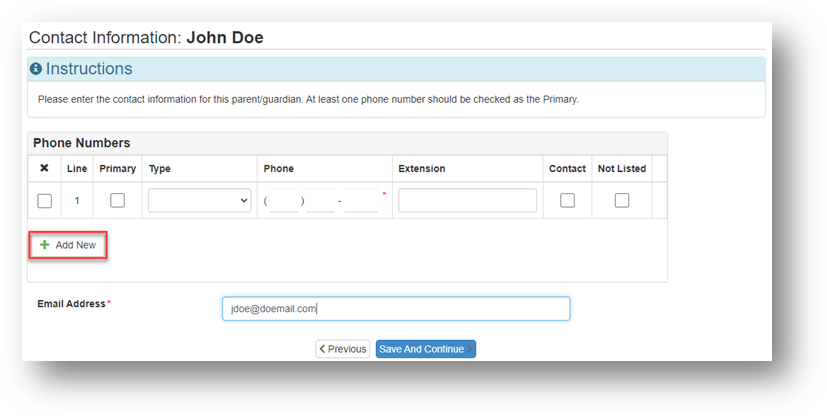
Ensure that the email address associated with the account is correct. Left-click the text box and enter the correct email address.
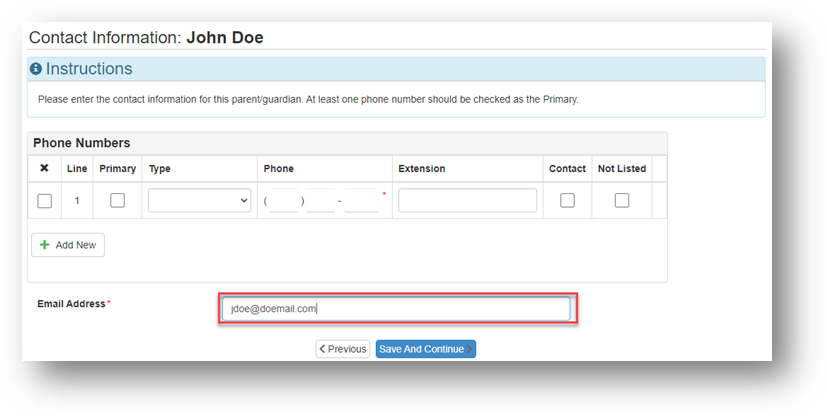
Once you have finished, click “Save And Continue”
Adding Additional Parents and Guardians
Once you have completed updating information for yourself, you will be taken to the Parent/Guardian screen which will allow you to specify additional Parents and Guardians associated with the students you are going to register.
To add an additional Parent or Guardian, select “Add New Parent/Guardian” and you will repeat this process for the new Parent or Guardian.
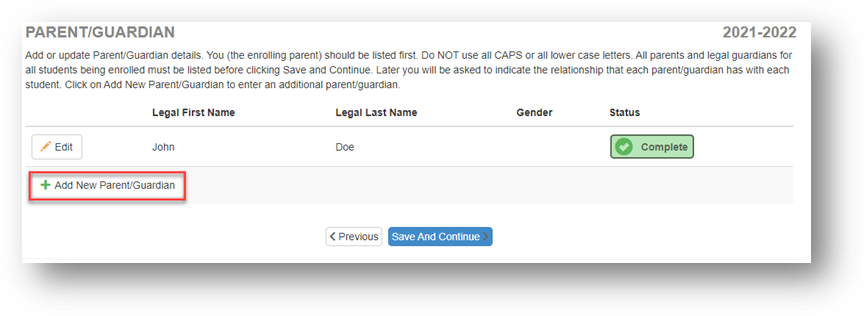
Once you have completed adding additional Parents or Guardians associated with the students you are going to register, or there are no more additional Parents or Guardians, select “Save And Continue”
Emergency Contacts
Next you will be asked to enter information about Emergency Contacts. Parents and guardians will always be contacted first, so they do not need to be listed here.
Later you will be asked to assign emergency contacts to each student.
To begin, left-click the “Add New Emergency Contact” button.
Demographics
Enter the Legal First Name and Legal Last Name of the specified emergency contact. This will need to match their identification if they need to be able to pick your student up from school.
You can also specify their Gender, Street Address, City, State, Zip Code, and Language of the specified emergency contact.
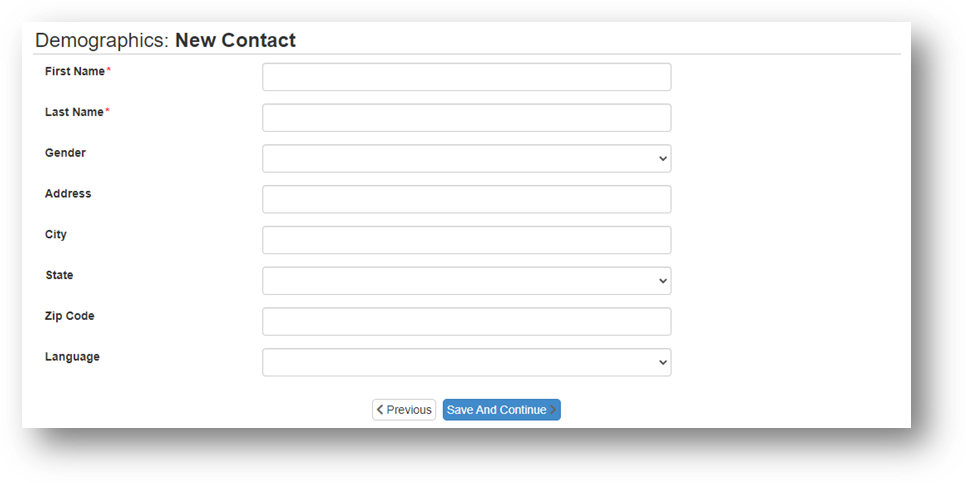
When you have finished, click “Save And Continue”
Contact Information
Next, provide us with at least one phone number to reach the emergency contact by left-clicking the appropriate text boxes and entering the corresponding number.
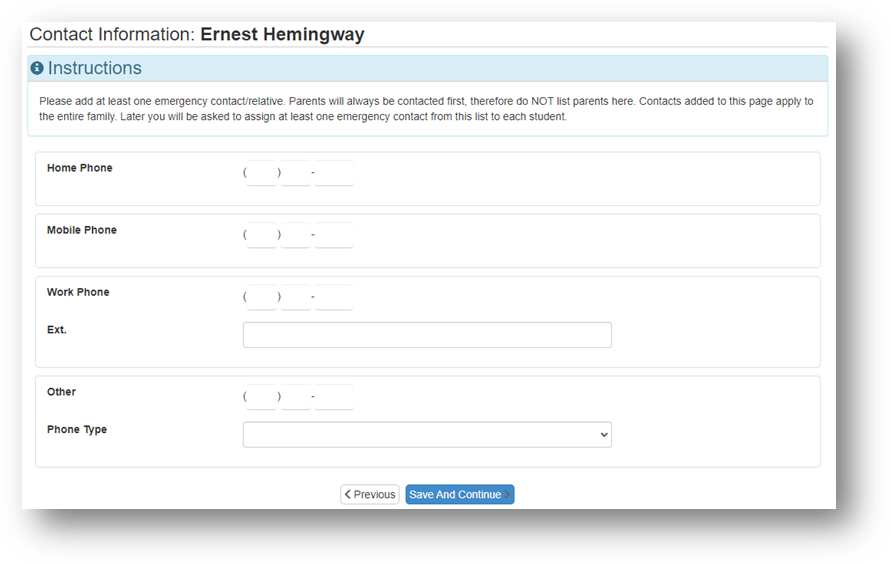
When you have finished entering contact numbers, click “Save And Continue”
Once you have finished entering information about Emergency Contacts, click “Save And Continue”
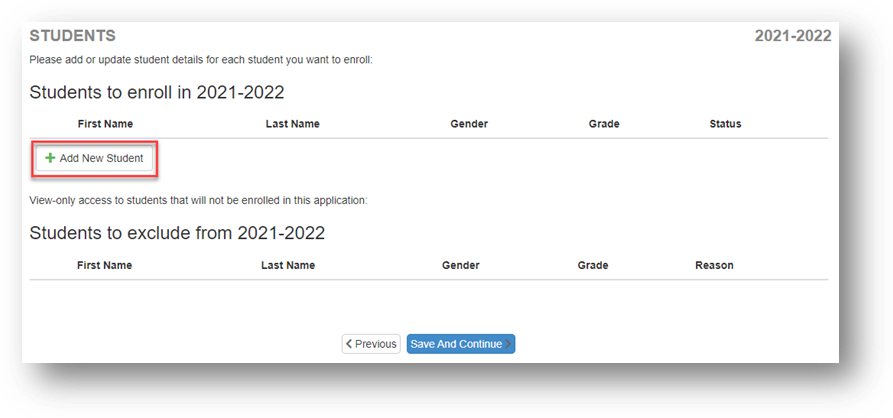
Students
Now we will add information specific to individual students.
If you have no students currently in the system, both lists will be blank. Click the “Add New Student” button to add a student to this registration.
New Student Demographics
Enter all relevant information for this student.
Legal First Name
Enter the student’s legal first name, as it appears on their Birth Certificate.Legal Middle Name
Enter the student’s legal middle name, as it appears on their Birth Certificate.No Middle Name
If the student does not have a Middle Name, left-click this checkbox.Legal Last Name
Enter the student’s legal last name, as it appears on their Birth Certificate.Gender
Select the student’s gender or gender identity.Birth Date
Enter the student’s Birth Date. You can either left-click the text box and enter the date in the MM/DD/YYYY format, or you can left-click the calendar icon and select the date
Entering Grade
Left-click the dropdown menu and choose which grade level this student is entering this year.Primary Address
Left-click the dropdown menu and choose which parents or guardians the student primarily resides with. To ensure this is correct, make sure the Home Address and Mail Address update with the correct information.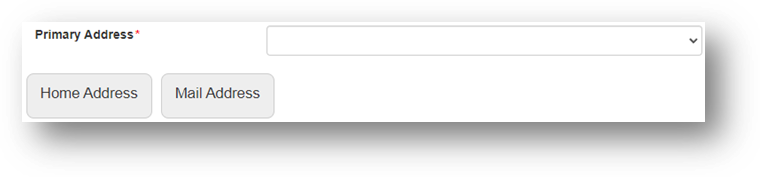
Was student retained last year?
Left-click the dropdown menu and choose whether or not the student was retained in the previous school year.Additional Student Information
Next we will need some information about where this student was born and if they have any military connection.
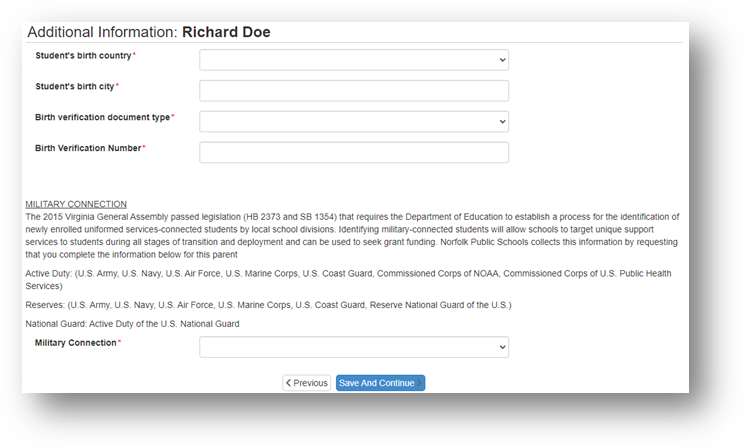
Student’s Birth Country
First, Select the Student’s Birth Country.If the Student was born in the United States, you will be prompted with this additional field:
Student’s Birth State
Enter which U.S. state the student was born in.If the Student was not born in the United States, you will be prompted with these fields:
Date the student entered the U.S.
Enter the date that the student entered the United States to become a resident.Date the student first attended school in the U.S.
Enter the date that the student first attended a school in the United States. If your student has never attended school in the United States, leave this value blank.Student has attended school in the U.S. for less than 3 cumulative years
If your student has attended school in the United States for less than 3 years, even if they are
not three years in a row, choose Yes. Otherwise, choose No.Months Non-US School Attendance
Enter the number of months the student has attended school outside of the United States.Student’s Birth City
Enter the city the student was born in.Birth Verification Document Type
Choose which Birth Verification Document Type you are going to upload.Birth Verification Number
Enter the number associated with the documentMilitary/Uniformed Services Connection
If the student is connected to the military, meaning that they have a parent or guardian in any of the below-listed uniformed services, select the appropriate response based on the status of their connection. Otherwise, if the student is not connected to the military, select “No Military Connection”Military Connection
Branch of Service
Type of Service
Active Duty
United States Army
Active Duty
United States Navy
Active Duty
United States Air Force
Active Duty
United States Marine Corps
Active Duty
United States Coast Guard
Active Duty
Commissioned Corps of NOAA
Commissioned Corps of US Public Health Services
Reserve
United States Army
Reserve
United States Navy
Reserve
United States Air Force
Reserve
United States Marine Corps
Reserve
United States Coast Guard
Reserve
Reserve National Guard of the United States
National Guard
United States National Guard
Active Duty
Student Contact Information
Next we will need some contact information for this student.
Enter any phone numbers that pertain to this student specifically, for instance, if they have a cellular device or can be reached at any other numbers than the ones you have provided. You do not need to provide your home phone number for this student.
If the student does not have any other phone numbers associated to specifically them, you can left-click the checkbox labeled “Student has no phone numbers.”
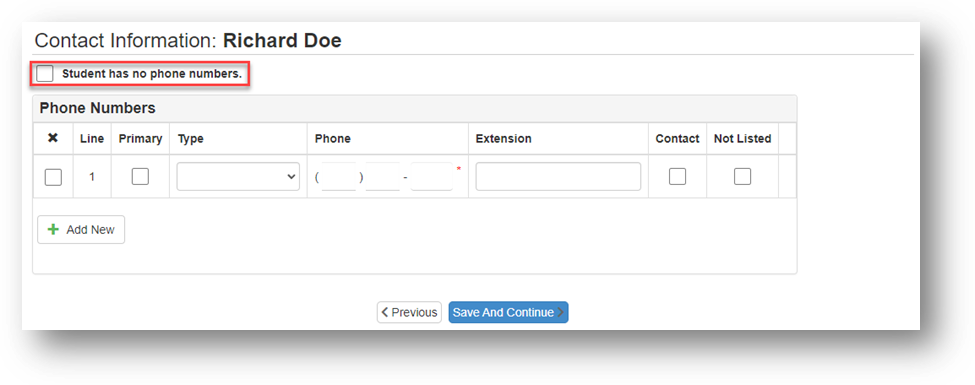
Otherwise, fill out the fields with the given number for this student.
X
Left-click this checkbox if you would like to remove this number as a contact number.Line
The line number for the table. You do not need to do anything with this number.Primary
Left-click this checkbox if you would like this to be the primary number we contact the student at. You should select at least one phone number as primary.Type
Left-click the dropdown menu and select what type of phone this number is associated to.Phone
Enter the area code, exchange code, and subscriber number into the respective parts of the 10-digit-phone number.Extension
Enter an extension, if applicable.Contact
Left-click this checkbox if you would like us to contact this number with our automated messaging service. This service is used to provide students, parents, and guardians with information regarding (among other things) school and program closures and delays (usually as a result of weather).Not Listed
Left-click this checkbox if this number is not listed.If you would like to provide us with additional contact numbers to reach this student, you can click the “Add New” button
McKinney-Vento Information
Next we will need information to determine eligibility for potential services under the McKinney-Vento Homeless Education Assistance Improvements Act of 2001, which is a Federal Law that provides federal money to a spectrum of programs in response to homelessness.
The McKinney Vento Act defines homeless children and youths as individuals who lack a fixed, regular, and adequate nighttime residence, including children and youths who are
- Awaiting foster care placement;
- Sharing the housing of other persons due to loss of housing, economic hardship, or a similar reason (sometimes referred to as doubled-up);
- Living in motels, hotels, trailer parks, or camping grounds due to lack of alternative adequate accommodations;
- Living in emergency or transitional shelters;
- Abandoned in hospitals; or
- Children and youths who have a primary nighttime residence that is a public or private place not designed for or ordinarily used as a regular sleeping accommodation for human beings;
- Children and youths who are living in cars, parks, public spaces, abandoned buildings, substandard housing, bus or train stations, or similar settings, or;
- Migratory children who qualify as homeless because they are children who are living in similar circumstances listed above
This screen asks if any of the living situations listed above apply to the student being registered. If one of those situations does, select “Yes” and otherwise select “No”
If one of these situations does apply to the student, you will be asked for additional information about where the student stays at night.
Does the student reside in the same nighttime residence as their parent or guardian?
What living situation best reflects the student’s situation?
Select this Option:
Yes
Sharing the housing of other persons due to loss of housing, economic hardship, or other similar reason.
Accompanied – Doubled Up
Staying in a Motel or Hotel
Accompanied – Hotel/Motel
Staying in a Shelter
Accompanied – Shelter
Not in a Shelter or otherwise in a place not designed for or ordinarily used as accommodations for human beings
Accompanied – Unsheltered
No
Sharing the housing of other persons due to loss of housing, economic hardship, or other similar reason.
Unaccompanied – Doubled Up
Staying in a Motel or Hotel
Unaccompanied – Hotel/Motel
Staying in a Shelter
Unaccompanied – Shelter
Not in a Shelter or otherwise in a place not designed for or ordinarily used as accommodations for human beings
Unaccompanied – Unsheltered
For any questions regarding the correct responses for McKinney-Vento Information, contact your child’s school and they will be able to assist you.
Once you have completed filling out McKinney-Vento information, left-click “Save And Continue”
Parent/Guardian Relationships
This screen will allow you to specify the relationships for this student and the Parent/Guardians you have on file, as well as ask for information regarding Court Restrictions regarding contact and whether or not the student resides in a foster home.
The upper section has a list of all of the Parents and Guardians associated with your account and is used to specify the relationship for a given student.

For each Parent or Guardian, you will need to specify the following information.
Relationship
Left-click the dropdown menu and select which relationship best suits the relationship between the specified parent/guardian and the student. If there is no relationship, left-click the “No Relationship checkbox.First Name, Last Name, and Gender cannot be edited here. If these need to be changed, make your selections and go back to the Parent/Guardian Tab.
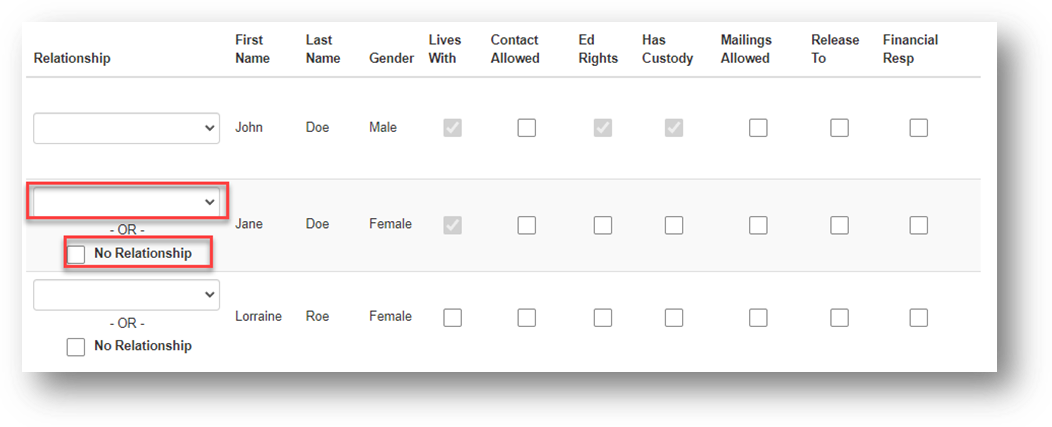
Lives With
Left-click to select this checkbox if the student lives with this parent/guardian. We specified in an earlier screen that the primary residence for this student was with John/Jane Doe, so it is unable to be “de-selected.”Contact Allowed
Left-click to select this checkbox if the parent/guardian is allowed to make contact with the student and whether or not the parent/guardian should be included in school-to-student communications.Educational Rights (Ed Rights)
Left-click to select this checkbox if the parent/guardian has rights to make decisions regarding the student’s education.Has Custody
Left-click to select this checkbox if the parent/guardian has legal custody of the student.Mailings Allowed
Left-click to select this checkbox if the parent/guardian may receive mailings regarding the student.Release To
Left-click to select this checkbox if the school may release the student to this parent/guardian. If you want this parent/guardian to be able to pick this student up from school, you must select this option.Financial Responsibility
Left-click to select this checkbox if the parent/guardian is financially responsible for this student.Once you have filled out the relationships table for the student, answer the two questions at the bottom of the page regarding court restrictions for contact and whether or not the student resides in a foster home.
Does this student have any court restrictions regarding a parent/legal guardian contact?
Left-click the dropdown menu and select “Yes” if the student does. Otherwise, select “No.”Does this student reside in a foster home?
If the student resides in a foster home, select “Yes,” otherwise select “No.”Once you have completed filling out the form, left-click “Save And Continue”
Emergency Contact Relationships
Now we will establish relationships between the emergency contacts on the account and the student.
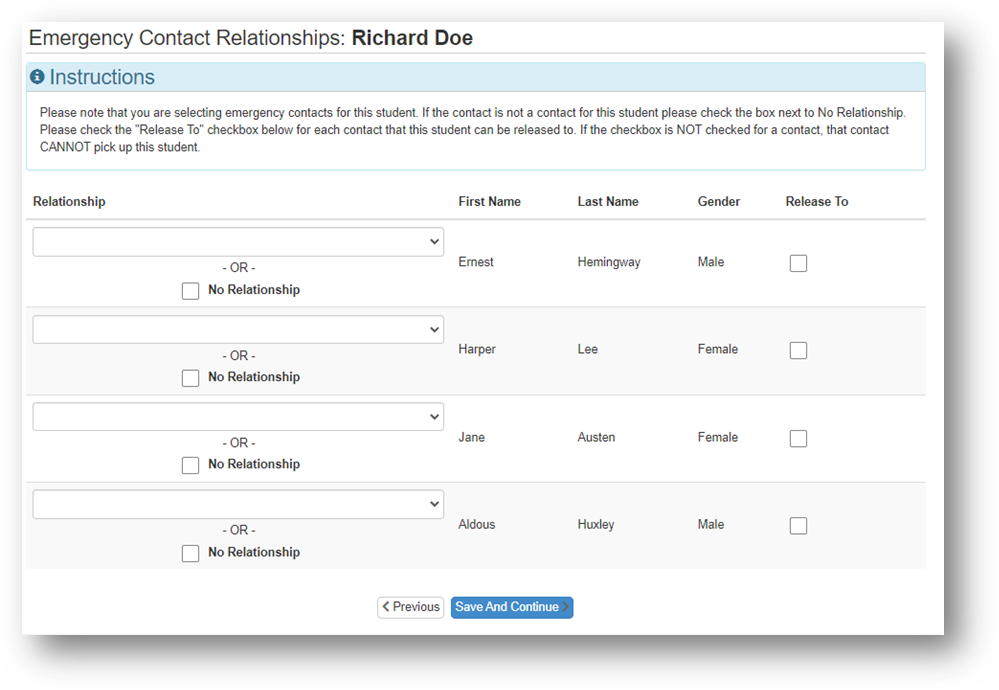
For each emergency contact, left-click the relationship dropdown menu and choose what relationship best fits the emergency contact for the specified student.
If you would like your student to be picked up by the emergency contact, select the “Release To” checkbox. We will not be able to release your student to the emergency contact unless you check this checkbox.
Once you have updated each contact, click “Save and Continue”
Emergency Contact Order
This screen will allow you to set the order the school should contact parents, guardians, and emergency contacts in case of emergency. If you selected “No Relationship” for a Parent, Guardian, or Emergency Contact, they will not appear here.
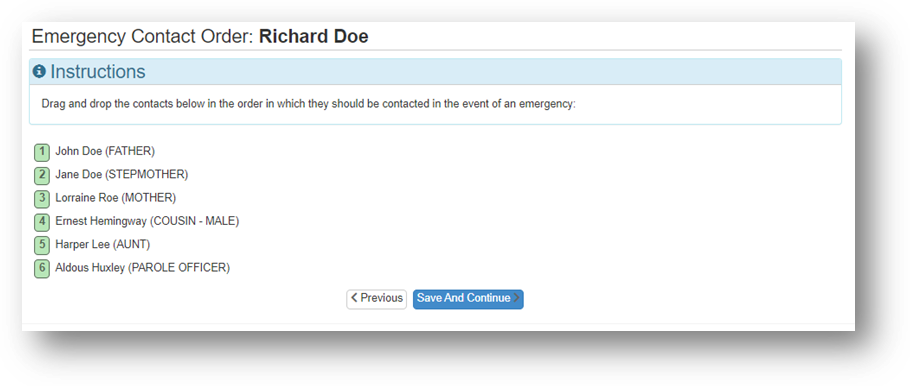
If you want to change the order, hold down the left-click on your mouse and drag the name into the spot you would like it to be listed.
Once the emergency contacts are in the correct order, left-click “Save And Continue”
Ethnicity
Next, we will get information about the student’s ethnicity and race.
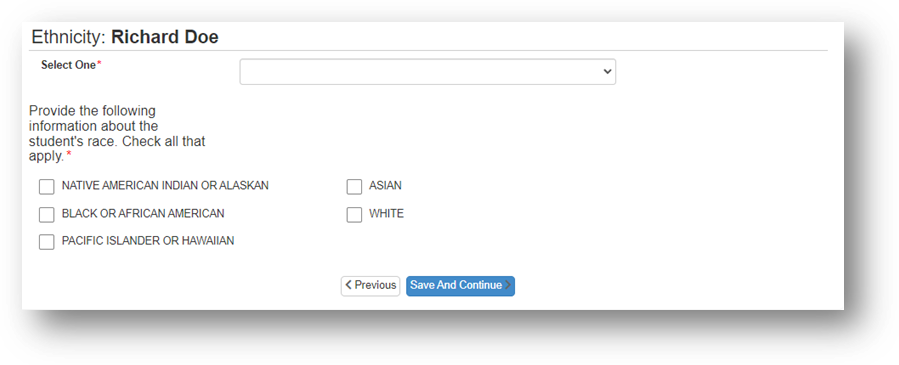
First, left-click the dropdown box labeled “Select One” and choose whether or not this student is Hispanic.
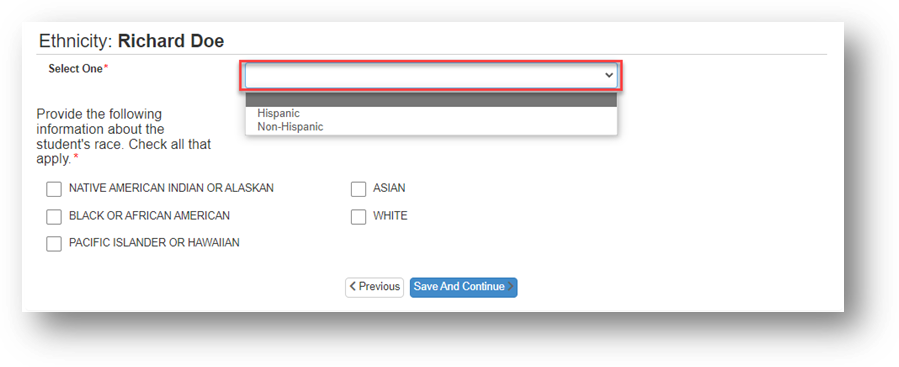
Next, left-click to select each checkbox associated with the student’s race. You can select as many that apply to this student.
When you are finished, click “Save And Continue”
Language Survey
Federal Regulations require school systems to survey students at the time of enrollment regarding the languages they speak. Please answer each question to the best of your ability.
What is the language the student first acquired?
Left-click the dropdown menu and select the language that the student first learned to speak.What is the primary language used in the home, regardless of the language spoken by the student?
Left-click the dropdown menu and select the language that is most often used in the home, not necessarily the language most spoken by the student?What language is spoken most often by the student?
Left-click the dropdown menu and select the language that is most often spoken by the studentWhat language do you wish to have communication from the school?
Left-click the dropdown menu and select the language you would like to receive communications from the school in.Next, we will answer questions regarding the student’s previous school experience in the United States.
Check this box if you are enrolling your student in a United States School for the first time.
If your student is being enrolled at a school for the first time in the United States, check the box.What date did your student first attend school in the United States?
If you did not check the box above, enter the date (month and year) that the student first attended school in the United States.Was your student receiving English Language Support Services (ESL, ESOL) at a previous United States school?
If you did not check the box above, please note whether your student was receiving English language support services at a previous school in the United States. If you are not sure whether or not your student was receiving these services, check “Not Sure.”Finally, we will answer some questions regarding your student’s experience with education in any state or country, including schooling in the United States.
For each age select whether the student attended school for the entire year (All), attended school for part of the school year (Some), or if the student did not attend school at all for the year (None).
When you are finished answering, click “Save And Continue”
Health Information
Next, we will ask for some information pertaining to the student’s Physician and Dentist, as well as some information pertaining to the health of the student.
Physician
Enter the Name, Phone Number, and preferred hospital for this student’s physician, if applicable. This information is not required.Dentist
Enter the Name, Phone Number, and Office location for the student’s dentist, if applicable. This information is not required.Does this student have any Health Conditions that the school should be aware of?
Select “Yes” if the student has any health conditions that the school should be aware of, otherwise select “No.”Is this student currently prescribed any medications?
Select “Yes” if the student is currently prescribed any medication, otherwise select “No.” You will be asked about which medications the student might take at school or at home on the following screen.Once you have finished entering this information, left-click “Save And Continue.”
Medications
This screen will allow you to specify what medications the student takes.
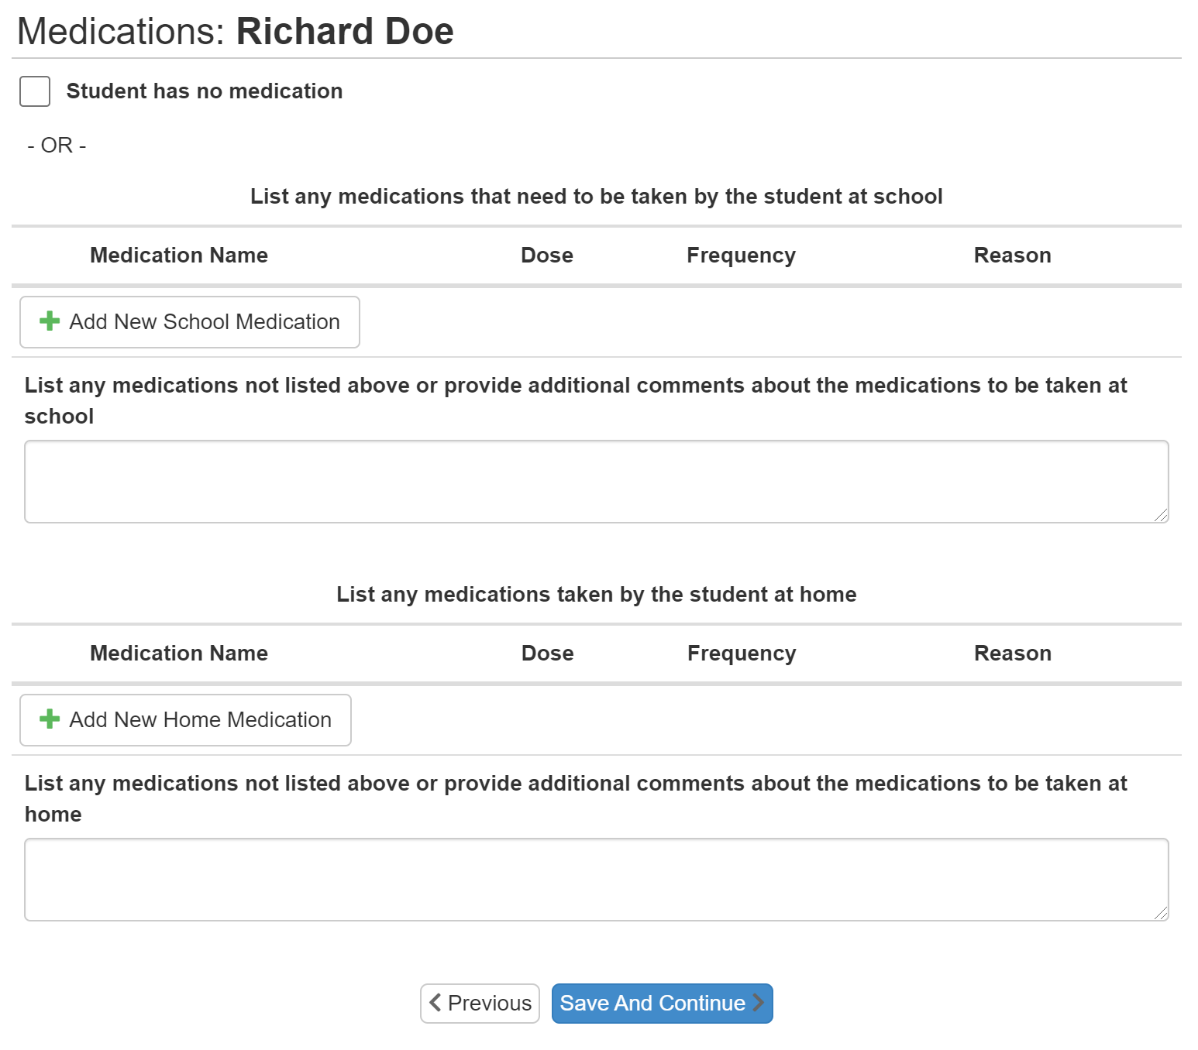
If the student does not take any medications, left-click the “Student has no medications” checkbox and click “Save And Continue”Otherwise, enter any medications that the student takes at home or would take in school.
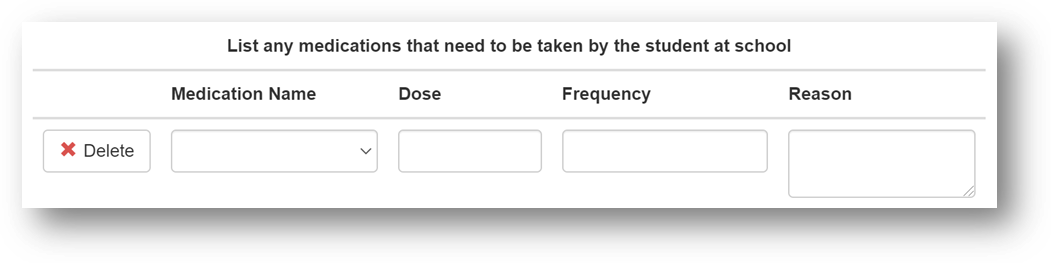
If the medication is to be taken by the student at school, left click the “Add New School Medication” to add an additional medication to the list.
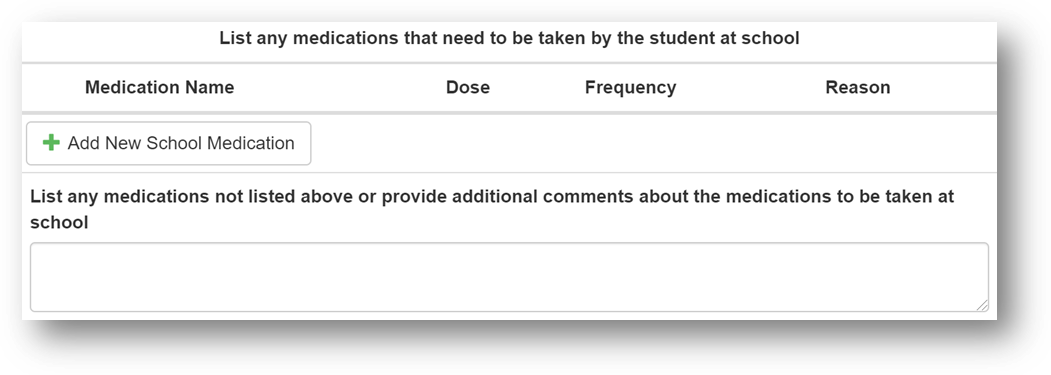
In the row that appears, enter in the related information.
Medication Name
Left-click the dropdown and select the type of medication the student takes.Dose
Left-click the text box and enter the dosage the student takes a given time.Frequency
Left-click the text box and enter how often the student takes the specified dose of the medication.Reason
Left-click the text box and enter the reason why the student takes the medication.If you need to delete a row, left-click the delete button.

If the medication is NOT taken at school, left click the “Add New Home Medication” button and enter the respective medication name, dose, frequency that the medication is taken, and reason for the medication.In the row that appears, enter in the related information.
Medication Name
Left-click the dropdown and select the type of medication the student takes.Dose
Left-click the text box and enter the dosage the student takes a given time.Frequency
Left-click the text box and enter how often the student takes the specified dose of the medication.Reason
Left-click the text box and enter the reason why the student takes the medication.
If a medication your student takes is not included in the dropdown list, go ahead and enter that information into the textbox below the list. You can also enter any other useful information here.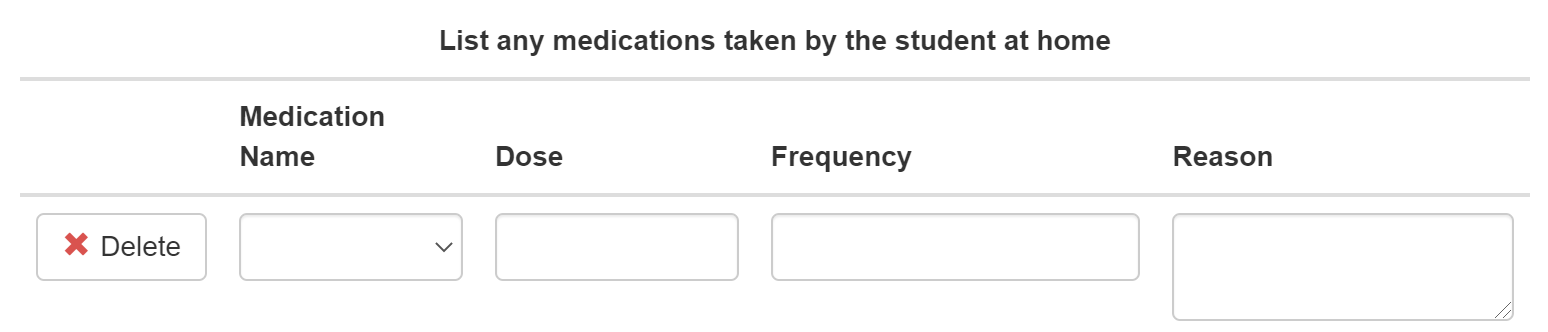 If you need to delete a row, left-click the delete button.
Once you have finished entering all medication that the student takes, left-click “Save And Continue”
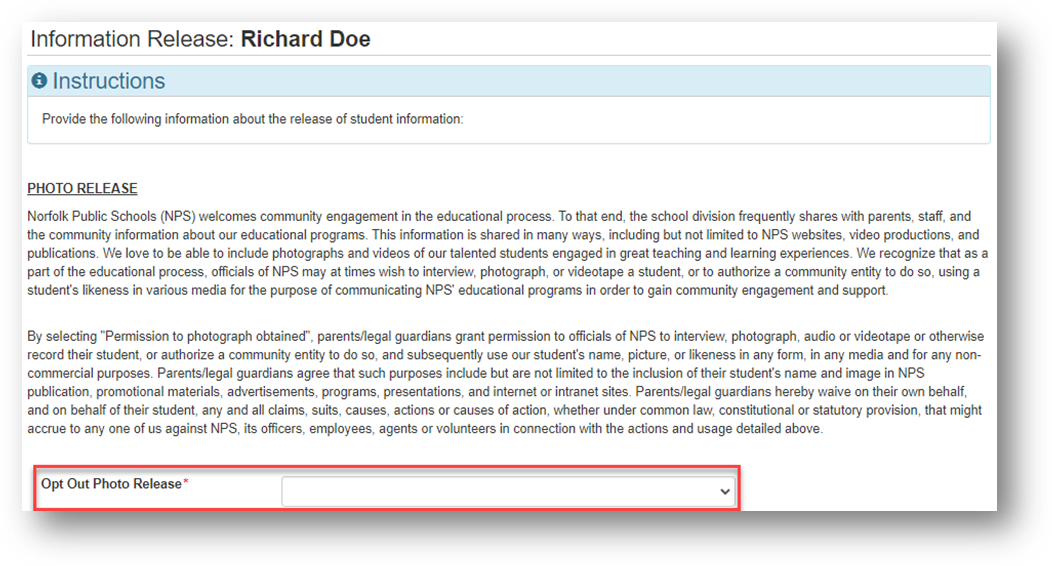
Information Release
Next, we will need you to agree to or deny the Norfolk Public Schools Photo Release policy and Internet Authorization.
Read through the Photo Release Policy at the top of the screen, and then left-click the dropdown menu underneath it labeled “Opt Out Photo Release” to choose a response. The responses and their definitions are detailed in the Photo Release.
Next, scroll down the page to the Internet Authorization Policy.
Read through the Acceptable User Procedure, and then left-click the dropdown menu underneath it labeled “Authorization to use the internet” and choose the appropriate response for this student.
If you do not see the Authorization to use the internet screen, contact your student’s school for assistance.

When you have finished answering the questions, select “Save And Continue”
Previous Schools Attended
This screen asks for information about the previous schools the student has attended in the past two (2) years. If the student has attended more than four (4) schools in the last two years, list only the last four schools they’ve attended.

For each row, enter the following information:
School Name
The name of the school the student attended.City
The city that the school is located in.State
If in the United States, enter the state that the school is located in.Country
The name of the school the student attended.Grade
The grade that the student attending participated in.School Year Attended
The school year that the student attended this school.Phone
The phone number of the school.Once you have finished entering information regarding the previous schools attended by this student, click “Save And Continue”
Discipline History
This screen will ask for information regarding the disciplinary history for this student.
Has this student ever been suspended from school?
If the student has never been suspended from school, select “No”If the student has been suspended from school, select “Yes.” You will be prompted to enter some additional information about the suspension.
Date of Suspension
Enter the date of the suspension. If the student has been suspended more than once, enter the date of the most recent suspension.Reason for Suspension
Enter the reason for the suspension. If the student has been suspended more than once, give the date and reason for the suspensions here.Length of Suspension (in days)
Enter the length of the suspension. If the student has been suspended more than once, enter the length of the longest suspension.Has this student ever been expelled from school?
If the student has never been expelled from school, select “No”If the student has been expelled from school, select “Yes.” You will be prompted to enter some additional information about the expulsion.
Date of Expulsion
Enter the date of the expulsion. If the student has been expelled more than once, enter the date of the most recent expulsion.Reason for Expulsion
Enter the reason for the expulsion. If the student has been expelled more than once and the other expulsions included violations in regards to weapons, alcohol, drugs, or willfully inflicting injury, Virginia law requires you to disclose that information, regardless if it is associated with the most recent expulsion. Under the Code of Virginia, anyone making a materially false statement or affirmation shall be guilty upon conviction of a Class 3 misdemeanor.Special Services
This screen will ask for information about the special services history for this student.
Has this student ever been tested for special services or programs?
If the student has never been tested for special services or programs, click “No” Otherwise, click “Yes.”Has this student ever participated in special services or programs?
If the student has never participated in special services or programs, select “No.”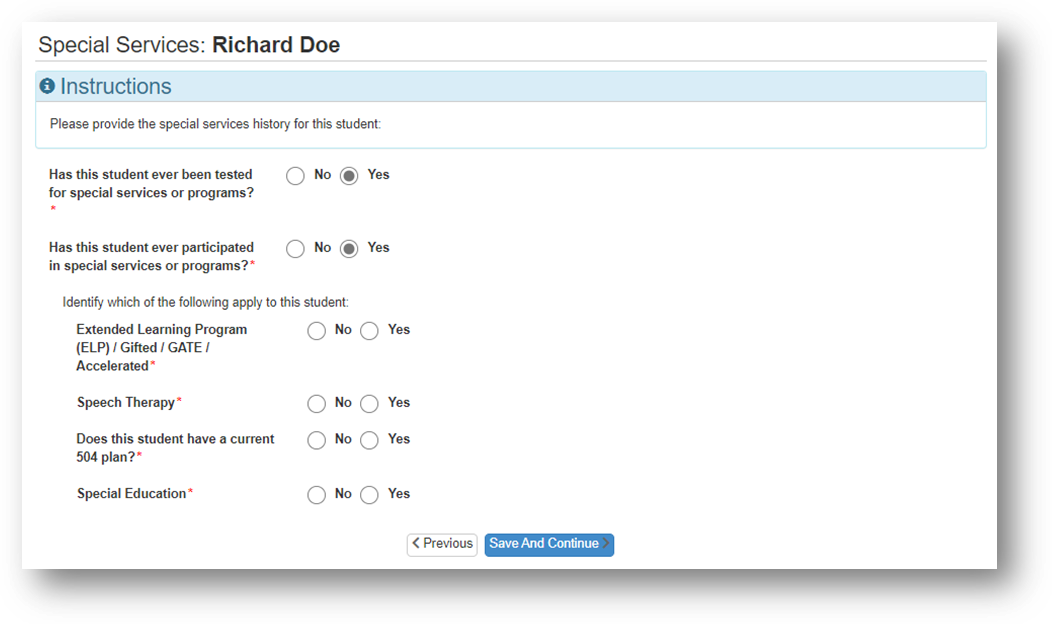
If the student has participated in special services or programs, select “Yes.” You will be prompted to identify from a list of programs what services they have participated in. For each program listed, choose “Yes” or “No”Once you have finished answering each question, click “Save And Continue”
School Selection
You can only register your student for their home school or Virtual Scholars Academy (VSA), a program in which students attend school through online sessions and working at their own pace without any in-person classes.
If you would like your student to be enrolled in VSA, left-click and select the checkbox at the top of the screen saying so.
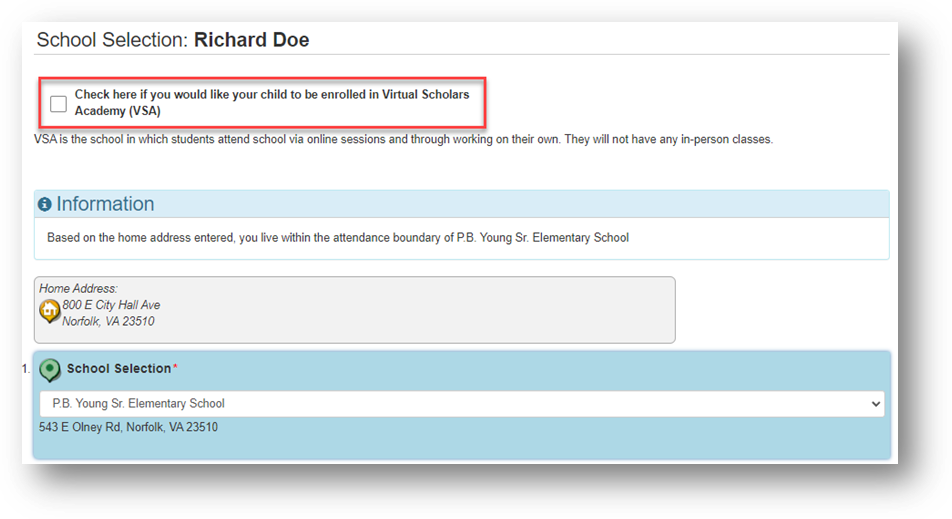
If you would like your student to be enrolled in their home school, first observe the school that is listed in the school selection. If you think this is not the correct home school, confirm the address for “Home Address” is correct or contact your student’s school. Once you know where your student’s school is located, click “Save And Continue”
If you would like your student to be enrolled at a school other than their home school, finish completing the registration for the home school and contact your preferred school’s office for assistance and inform them that you completed the registration online and submitted it to the student’s home school. You will want to inform them which school is the student’s home school.
Adding Additional Students
This concludes the process of adding a student. You should be returned to the Students screen. If you would like to add another student to the registration, left-click the “Add New Student” button
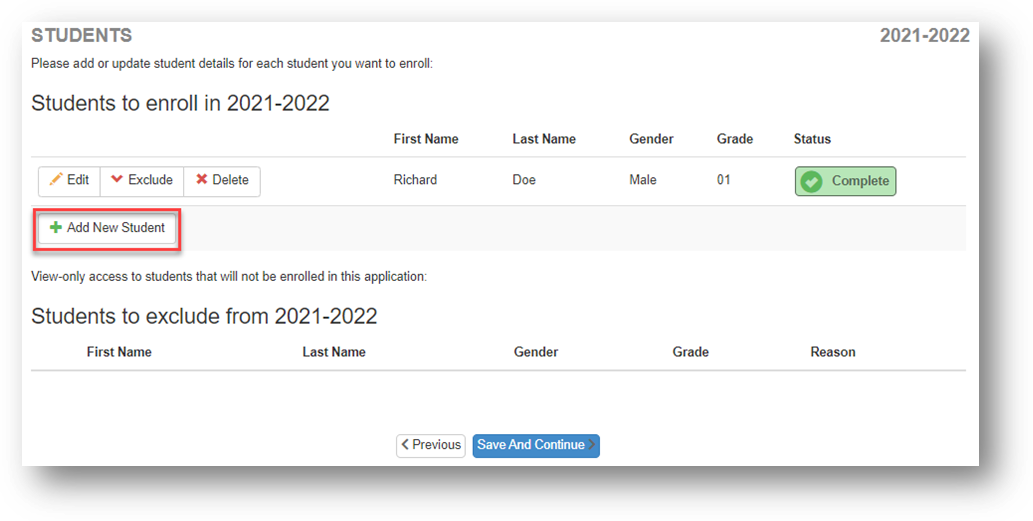
Once you have finished adding students, click “Save And Continue”
Excluding/Including Students from a Registration
If you decide that a student does not need to be added to this registration, you can left-click the “Exclude” button associated with the student’s row and they will be placed in the list of students to exclude from this registration.
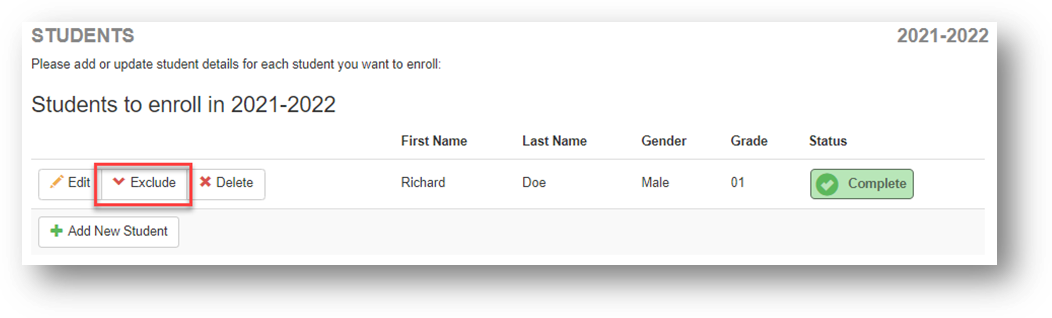
If you decide that a given student actually does need to be included in this registration, you can left-click the “Include” button associated with the student’s row and they will be placed in the list of students to be included in this registration.

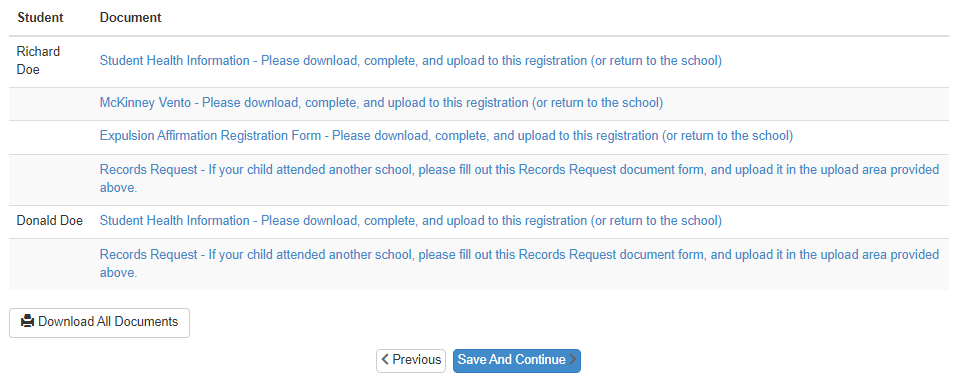
Documents
Next, we will allow you to upload some of the documentation that we will need in order to enroll your student in Norfolk Public Schools. Depending on your selections, certain documents may be available or unavailable for certain students, but all of the documents will work the same way.
At the bottom of the screen, blank versions of some of these documents are available, depending on your selections through the registration process. You can download these by clicking on them. You can also choose to download all the documents by left clicking the button labeled “Download All Documents”
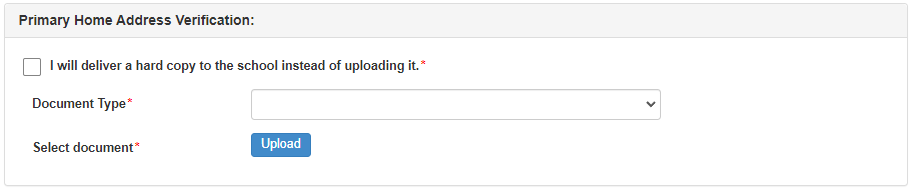
Each document upload option will look somewhat like this. You can choose to deliver the document to the school instead of uploading it, or you can choose to upload the document here in Online Registration.
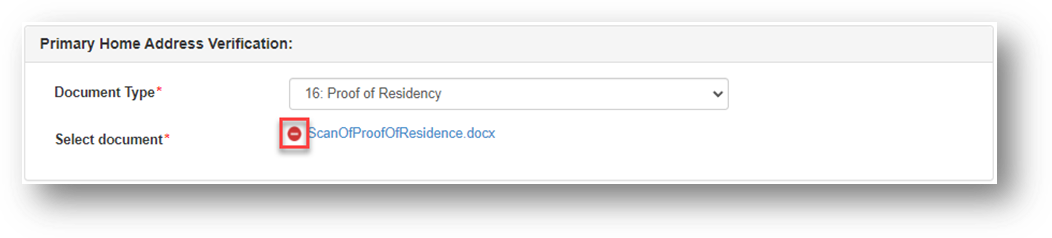
Some documents will ask for you to specify the type of document; if so, you can select the document type using the dropdown menu.
If you need to change what document you upload, you can click the “Delete” icon next to the document name once you upload it.
When you have finished responding to the questions about each of the documents, you can proceed by left-clicking “Save And Continue”
Review/Submit
Before you can submit the registration to your student’s respective school(s), you must first review the information to make sure it is correct.
To begin the review process, left-click the “Review” button
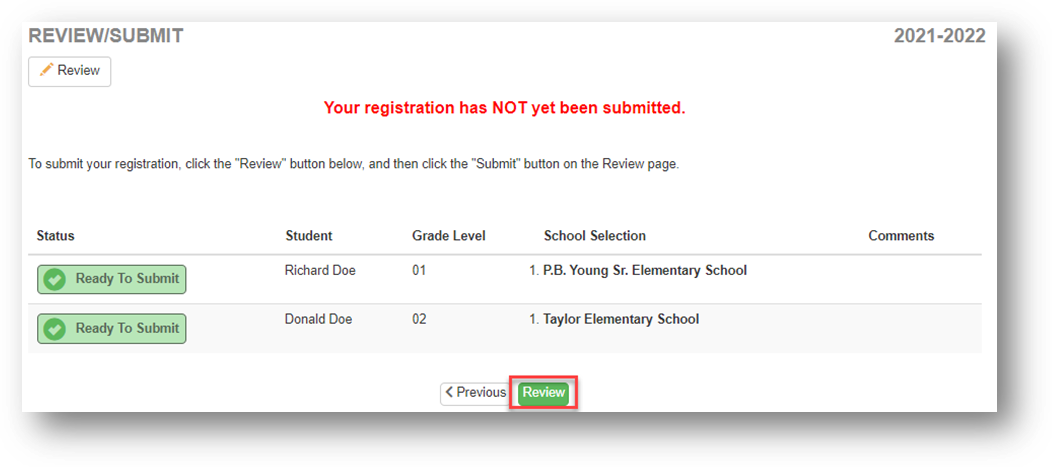
The review process will show you all of the information included in this registration.
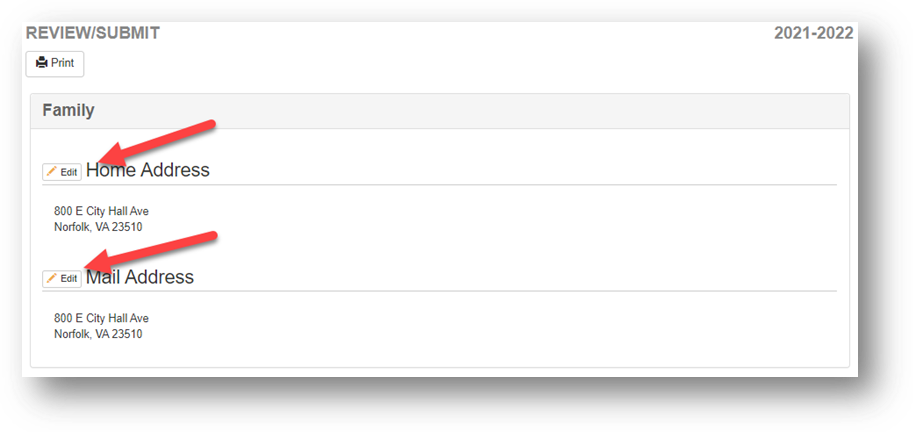
Information in Green is information that is new. Information in Yellow is information that you have edited with this registration.
Read over the page and verify all of the information is accurate. If you need to edit any information in any section, you can click the “Edit” buttons in each section.
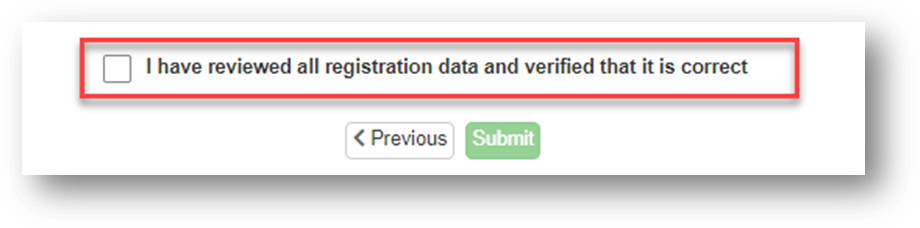
Once you have reached the bottom of the review screen, affirm that you have reviewed all registration data and verified that it is correct by left-clicking on the checkbox labeled as such.
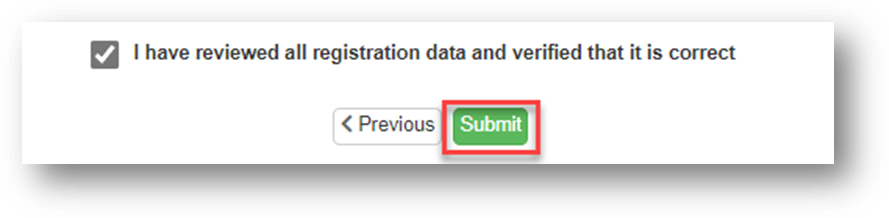
Once you have affirmed that the registration is accurate, click Submit to submit your registration.
Once you registration is submitted, you should receive an email confirming that the registration was submitted. At this point you will need to contact you student’s school in order to complete the enrollment in person. Your student is not enrolled as a result of this process.
You can check on the status of your registrations by looking at the Online Registration Status Page.
Select a School...
Select a School
- Academy of International Studies at Rosemont
- Academy for Discovery at Lakewood
- Azalea Gardens Middle School
- Bay View Elementary School
- Berkley / Campostella ECC
- Blair Middle School
- Booker T. Washington High School
- Camp Allen Elementary School
- Camp Young
- Chesterfield Academy
- Coleman Place Elementary School
- Crossroads School
- Easton Preschool at Fairlawn
- Ghent School
- Granby Elementary School
- Granby High School
- Hospital School Programs at CHKD
- HRVA EdTech
- Ingleside Elementary School
- Jacox Elementary School
- James Monroe Elementary School
- Lake Taylor High School
- Lake Taylor School
- Larchmont Elementary School
- Larrymore Elementary School
- Lindenwood Elementary School
- Little Creek Elementary School
- Madison at Easton
- Mary Calcott Elementary School
- Maury High School
- NET Academy
- Norfolk Technical Center
- Northside Middle School
- Norview Elementary School
- Norview High School
- Norview Middle School
- NPS-VSA
- Ocean View Elementary School
- Oceanair Elementary School
- Open Campus
- P. B. Young, Sr. Elementary School
- Richard Bowling Elementary School
- Ruffner School
- Sewells Point Elementary School
- Sherwood Forest Elementary School
- Southside STEM Academy at Campostella
- St. Helena Elementary School
- Suburban Park Elementary School
- Tanners Creek Elementary School
- Tarrallton Elementary School
- W. H. Taylor Elementary School
- Willard Elementary School
- Willoughby Early Childhood Center